What is the Media Marquee?
The Media Marquee is an innovative and highly engaging tool designed to create captivating, continuously animated displays of images and videos on your WordPress website. This versatile Elementor component allows you to showcase a diverse collection of visual content in a compact, interactive, and visually stunning format. Whether you want to highlight a photo gallery, feature product demonstrations, or present client logos, the Media Marquee provides a modern solution for adding motion to your web pages and grabbing user attention. It’s an essential widget for any Elementor user looking to add dynamic content and animated effects to their web pages.
Common use case for the Media Marquee
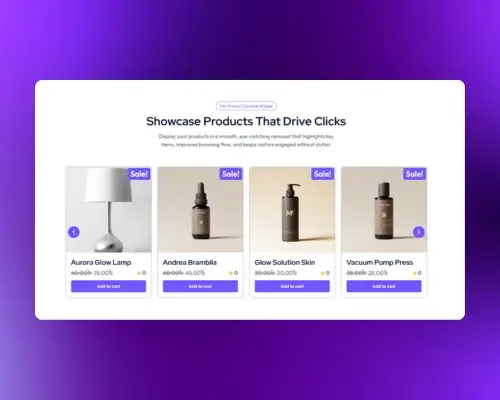
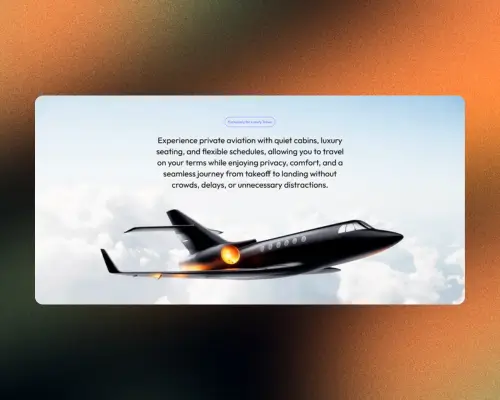
A typical use case for the Media Marquee is to create a visually striking and continuously scrolling client logo carousel or a dynamic portfolio presentation of recent projects and work samples. Businesses frequently use this widget on their homepage or dedicated “Our Clients” sections to build trust and credibility by prominently displaying their partnerships in a continuous loop. Similarly, designers, photographers, and agencies can leverage this unique widget to present a continuous, eye-catching stream of their best work, making their online portfolio more interactive and memorable. This keeps visitors engaged and allows you to display a large number of visual elements without taking up excessive page space.
Additional use cases
- Highlighting testimonials with images/videos: Create a compelling display of customer testimonials, featuring their photos or short video clips that continuously scroll to build social proof.
- Event photo gallery showcase: Develop a dynamic and engaging photo gallery from events, conferences, or workshops that continuously scrolls, providing a lively visual recap.
- Product feature visual demonstrations: Efficiently display multiple product images, lifestyle shots, or short video demonstrations of product features, enhancing the e-commerce user experience.
Requirement’s
- You need the Marquee Addons and Marquee Addons Pro plugin installed and activated on your website.
- You can find detailed installation instructions in our dedicated installation blog post.
- Make sure that this addon is enabled so you can find it in the Elementor editor.
- Marquee Addons works only with Elementor Page Builder plugin so you will need to have it installed and activated as well.
Add the widget
To add the powerful Media Marquee to your Elementor-powered website and start creating dynamic scrolling media displays, follow these simple steps:
- Open your page or post in the Elementor editor.
- In the Elementor sidebar, use the search bar to find the Media Marquee.
- Drag the Media Marquee from the widgets panel and drop it into your desired section or column on your page. This will instantly add a new, engaging scrolling media element to your design.

Video tutorial for Media Marquee
See a video demonstrating the widget in action.
Settings for the Media Marquee
The Media Marquee offers extensive customization options categorized into three main tabs: Content, Style, and Advanced.
Content tab
The Content tab is where you define the media items for your showcase and configure its core scrolling behavior.
Media List
Layout: Choose how your cards display in Elementor—Carousel or Marquee—and fine-tune spacing, speed, and direction. For the full walkthrough, read :
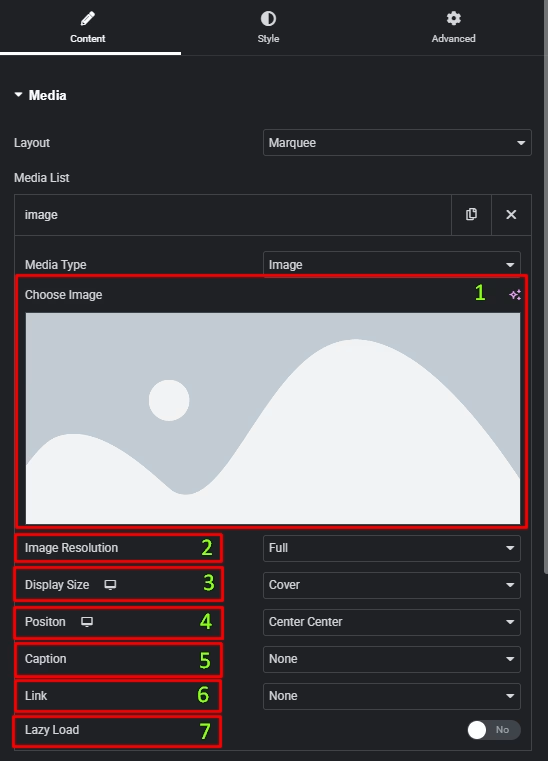
For Images: Click on the thumbnail to upload a new image or select an existing one from your WordPress media library.
- Choose Image: Upload a new image or choose one from your library.
- Image Resolution: Select the resolution of the image to display.
- Display Size: Control how the image fits inside its container, such as cover, contain.
- Position: Set the image alignment inside its container.
- Caption: Add descriptive text for your image. Options include None, Title, Caption, Description (pulls from WordPress media fields), or Custom for unique text.
- Link: Add a Link to your image. You can choose from various options, including Custom URL.
- Lazy Load: Enable or disable lazy loading for the image for improved performance.
For Videos: Select your Video Source (e.g., YouTube, Vimeo, Dailymotion, or Self Hosted) and paste the video’s link into the field. You can also set a specific Start Time and End Time (in seconds) for the video playback.
- Video Source: Choose where your video is hosted: YouTube, Vimeo, Dailymotion, or Self Hosted. This determines how Elementor fetches the video.
- Link: Paste the URL of your video.
- Caption: Add a caption for your video. If you choose Custom Caption, a text field will appear for you to write your own caption.
- Start Time & End Time: Specify the exact time (in seconds) where the video should begin and stop playback.
- Play on Hover: Enable this option to automatically play the video when a user hovers over it.
- Custom Thumbnail: Use a custom image as the video thumbnail instead of the default.
- Play Icon: Select from various pre-defined play icon styles for your video.

Marquee Options
- Animation: Turn on or off the continuous scrolling animation.
- Show Vertical: Enable this for vertical scrolling instead of horizontal.
- Reverse: Change the direction of the animation.
- Pause On Hover: When a user’s mouse hovers over the widget, the animation will stop.
- Drag to Scroll: Allow users to manually drag the media carousel left and right (or up and down).
- Speed: Control the speed of the scrolling animation.
- Show Edge Shadow: Add a subtle shadow effect on the edges of the carousel.
- Marque On Scroll: Add a subtle marqee movement effect while page scroll.
- On Hover: Select a visual effect to apply when the user hovers over a card.

Style tab
The Style tab allows you to visually customize every aspect of your Media Marquee, ensuring it perfectly matches your website’s design.
Media
- Aspect Ratio: Define the proportional dimensions of your media items.
- Width: Adjust the size of the individual media items within the showcase.
- Section Height: Adjust the height of the media container when Show Vertical is enabled.
- Border Type : Choose a border style.
- Border Radius : Add rounded corners.
- Box Shadow: Add a shadow effect around each card.
- CSS Filters: Apply visual effects like blur, brightness, and saturation to your media.

Caption
- Positon: Set the vertical alignment of the caption text.
- Alignment: Set the horizontal alignment of the caption text.
- Text Color: Choose the colors for your caption text and its background.
- Typography: Customize the font, size, weight, and more for your captions.
- Text Shadow: Add a text shadow on the caption.
- Caption Spacing: Adjust the spacing between the media and the caption.

Play Icon (For video items only)
- Color & Icon Size: Adjust the color and size of the video play button.

Advanced tab
The Advanced tab provides a comprehensive set of controls that are common to most Elementor widgets, allowing for refined design and responsiveness. Here you can adjust the widget’s Layout (e.g., positioning, Z-index), apply engaging Motion Effects (like scrolling effects or entrance animations), customize its Background, add Borders and Box Shadows, apply Masks for unique shapes, control Responsive visibility across devices, add custom HTML Attributes, and inject Custom CSS for bespoke styling.

Frequently Asked Questions (FAQ)
Q: What is the difference between the Media Marquee and a standard gallery or slider?
A: The main difference is the continuous, looping animation. While standard galleries and sliders often require user clicks to navigate, the Media Marquee creates an infinite, animated flow of content. This makes it an excellent choice for a dynamic, hands-free display of images and videos.
Q: Can I mix both images and videos within a single Media Marquee?
A: Yes, absolutely! The Media Marquee is designed to be highly versatile. You can easily add and arrange both images and videos within the same carousel, allowing you to create a rich and diverse visual experience for your visitors.
Q: Is the Media Marquee responsive on all devices?
A: Yes, the widget is built with responsiveness in mind. By default, it will adapt to different screen sizes. You can also use the Responsive settings in the Advanced tab to hide or show the widget on specific devices (desktop, tablet, or mobile) for precise control over your design.
Q: How can I change the speed and direction of the scrolling animation?
A: You can easily adjust these settings in the Content tab, under the Marquee Options. Simply use the Speed control to make the animation faster or slower, and toggle the Reverse option to change the scrolling direction.