What is the Button Marquee?
The Button Marquee turns ordinary buttons into a smooth, scrolling marquee that keeps your CTAs in constant view. Pick direction (left/right), speed, gap, repeat, pause-on-hover, and optional icons/separators to showcase promos, announcements, or quick links—without custom code.
Common use case
Show a single looping CTA button in the hero or header to keep the primary action always visible and drive clicks.
Additional use cases
- Promotion ticker — Repeat one short promotional message.
- Announcement bar — Loop a concise update or notice.
- Directional prompt — Emphasize one clear next step or destination.
Requirements and Installation
To use the Button Marquee, you must meet the following requirements:
- You need the Marquee Addons plugin (Free) installed and activated on your website.
- You can find detailed installation instructions in our dedicated installation blog post.
- Make sure that this addon is enabled so you can find it in the Elementor editor.
- Marquee Addons works only with the Elementor Page Builder plugin, so you will need to have it installed and activated as well.
Add the widget
To add the Button Marquee to your Elementor-powered website, follow these simple steps:
- Navigate to the Elementor editor for the page you want to edit.
- In the widgets panel, search for the Button Marquee.
- Drag the widget to your desired location on the page.

Settings for the Button Marquee
The customization options for the Button Marquee are divided into three main tabs: Content, Style, and Advanced.
Content Tab
The Content tab is where you set the button text and link (Custom/YouTube/Vimeo/Self-Hosted), optional icon, and the marquee’s scrolling behavior.
Button:
Defines the content and link for each button marquee.
- Text: Set the button label.
- Link Type: Choose Custom, YouTube, Vimeo, or Self Hosted.
- Link / Video File: Enter a URL/anchor, or upload/select a file when Self Hosted is chosen.
- Icon: Pick an icon for the button.
- Icon Position: Place the icon before or after the text.
- Icon Spacing: Set the gap between the icon and text (responsive).
- Button ID: Assign a unique ID for tracking or custom CSS/JS (no spaces).
Note: The icon is visible only when an icon is selected and a size is set in Style → Icon → Icon Size.

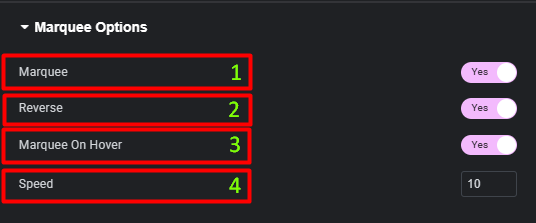
Marquee Options:
Controls the scrolling behavior of the button row.
- Marquee: Turn continuous scrolling On/Off.
- Reverse: Flip the scroll direction (LTR ⇄ RTL).
- Marquee On Hover: Animate only on hover for a subtle effect.
- Speed: Set the scroll speed (higher = faster).
Style Tab
The Style tab provides options to fine-tune the appearance of Button Marquee and set the icon’s color and size.
Button:
- Position: Align buttons inside the track (Left, Center, Right or Full width).
- Gap: Space between repeated text in the marquee effect.
- Typography: Font family, size, weight, transform, line-height, letter spacing.
- Text Shadow: Add shadow to the button label.
- Text Color: Set label color for each state.
- Background Type: Classic or Gradient background per state.
- Box Shadow: Shadow for depth on Normal/Hover.
- Border Type: Choose between Default, None, Solid, Double, Dotted, Dashed, Groove; then set border width and color.
- Border Radius: Round the corners.
- Padding: Inner spacing of the button.
- Icon Color: Set icon color for the button.
- Icon Size: Define icon size (required for the icon to appear).

Advanced tab
The Advanced tab provides a comprehensive set of controls that are common to most Elementor widgets, allowing for refined design and responsiveness. Here you can adjust the widget’s Layout (e.g., positioning, Z-index), apply engaging Motion Effects (like scrolling effects or entrance animations), customize its Background, add Borders and Box Shadows, apply Masks for unique shapes, control Responsive visibility across devices, add custom HTML Attributes, and inject Custom CSS for bespoke styling.
Frequently Asked Questions
How do I change speed, direction, or spacing?
Use Content → Marquee Options. Set Speed, toggle Reverse for direction, and adjust Gap to control the space between repeated text in the loop.
Can I link to a URL or video?
Yes. In Content → Button, choose Link Type: Custom, YouTube, Vimeo, or Self Hosted. Then set Link / Video File (upload/select a file for Self Hosted).
Why isn’t my icon showing on the button?
Add an Icon in Content → Button, then set Icon Size in Style → Icon. The icon only appears when a size is defined.